In this article:
Your iPhone holds the key to unlocking a detailed log of your whereabouts, a feature that often goes underutilized. Through the “Significant Locations” functionality, your device meticulously records places you frequently visit, detailing the dates and times of these visits. Understanding how to check location history on iPhone is a valuable skill in today's digitally driven world.
This article is designed to guide you how to track a cellphone for free, from the basics of viewing your iPhone location history to employing third-party apps for a more comprehensive insight. Whether you're curious about your travel patterns or need this information for more practical reasons, you'll learn how to look up location history on iPhone effectively.
Why Monitor iPhone Location History
Seeing your iPhone past locations is not just about keeping tabs on where you've been. It serves multiple practical and critical functions that can impact your daily life and security. Understanding why and how to check location history on iPhone can empower you to make informed decisions about your privacy and safety.
Privacy control: Keeping tabs on your location history helps you manage who has access to your whereabouts, ensuring your privacy is protected. By reviewing and managing this data, you can prevent any unauthorized tracking and maintain control over your personal information.
Family safety: For parents and caregivers, monitoring iPhone location history provides reassurance about the safety and well-being of family members, particularly children and elderly relatives. It enables real-time monitoring and facilitates quick locating in case of emergencies.
Legal and security purposes: Location history can serve as crucial evidence in legal proceedings or emergencies. It can help establish alibis, verify movements, or aid in search and rescue efforts during crises, potentially leading to life-saving outcomes.
Enhanced features: Third-party apps may offer advanced features for tracking iPhone location history, such as detailed route histories, precise time stamps, and mileage tracking. These features cater to various needs, including professional mileage tracking and personal projects.
Troubleshooting and updates: Being aware of any technical issues or updates related to accessing location history ensures continuous access to this valuable data without interruption. Staying informed helps maintain the reliability and accuracy of location tracking.
View Someone’s Location History in FamiEyes
FamiEyes offers a unique solution for families seeking to keep track of each other's whereabouts through their iPhones. This third-party service integrates with Apple's native settings, allowing for seamless sharing and monitoring of location data among family members. Here's how you can set up and use FamiEyes to view location history:
- Step 1: Create an account for FamiEyes iPhone tracker and opt for a well-suite pricing plan;
- Step 2: Once ready, check your inbox to see if there’s a confirmation letter. Follow the instructions and install the app on the target phone;
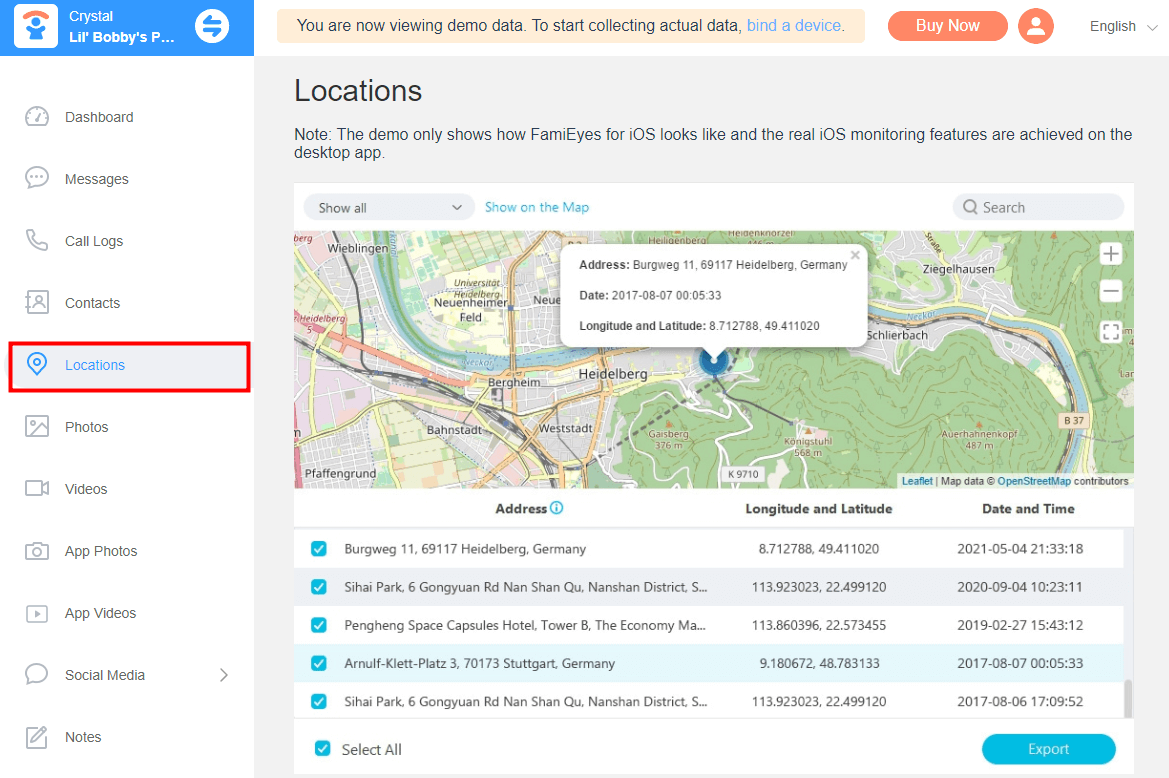
- Step 3: On your end, login to the online dashboard and click “Locations” from the left column. On that interface, you can view all the past locations that the user of this iPhone has ever been. Apart from the locations, FamiEyes offers the exact longitude, latitude, date, and time.


- SMS monitoring: Monitor incoming and outgoing text messages (SMS) on the target device, including the content of the messages, the sender's and recipient's phone numbers, and timestamps.
- Call log history: See a detailed record of all incoming and outgoing calls, such as the phone numbers involved, call durations, timestamps, and types.
- WhatsApp tracking: Monitor conversations and activities within the WhatsApp messaging app.
- Gallery monitoring: Allow you to access and view photos and videos stored on the target device.
- Browser history monitoring: Track the browsing history of the target iPhone, including websites visited, URLs entered, and searches performed.
How to See Full Location History on iPhone
To explore the full scope of your location history on your iPhone, there are “Significant Locations” you can employ to uncover where you've been, along with the times and dates of those visits. Understanding how to access this information can be crucial for both personal insight and managing your privacy settings.
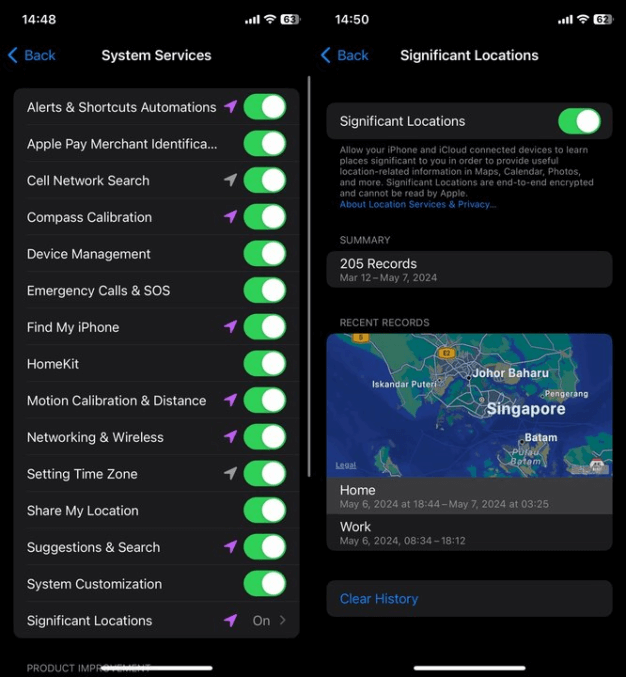
- Step 1: Start by opening your iPhone’s Settings app. Scroll down and select “Privacy & Security” to proceed.
- Step 2: Tap on “Location Services” at the top of the menu. Scroll down to find “System Services” and tap to open it.
- Step 3: Here, you will find “Significant Locations” (previously known as “Frequent Locations”). You may need to authenticate with Face ID, Touch ID, or your passcode. At the bottom of the “Significant Locations” page, you can see a detailed list of places you’ve visited, along with corresponding dates and times.
People also read:
See Past Locations in Life360
Life360 is renowned for its family safety features, offering tools like location history tracking that prioritize transparency and the well-being of loved ones. It allows users within a "Circle" to view each other's location history, provided location-sharing permissions are set to “Always”.
Here's a detailed guide on how to leverage Life360 to monitor past locations effectively:
- Step 1: Launch the Life360 app on your smartphone. Ensure that you are logged in to your account. In the app, navigate to the menu or settings. Check that all members of your Circle have their location-sharing turned on.
- Step 2: Choose the date and time range for which you want to see past locations. Life360 typically allows you to select specific dates or choose a range.
- Step 3: After selecting the date range, select a family member’s profile to view up to 2 days of location history on the Free Plan, or up to 30 days on Gold and Platinum plans. You can zoom in on the map to see more detailed information about each location.
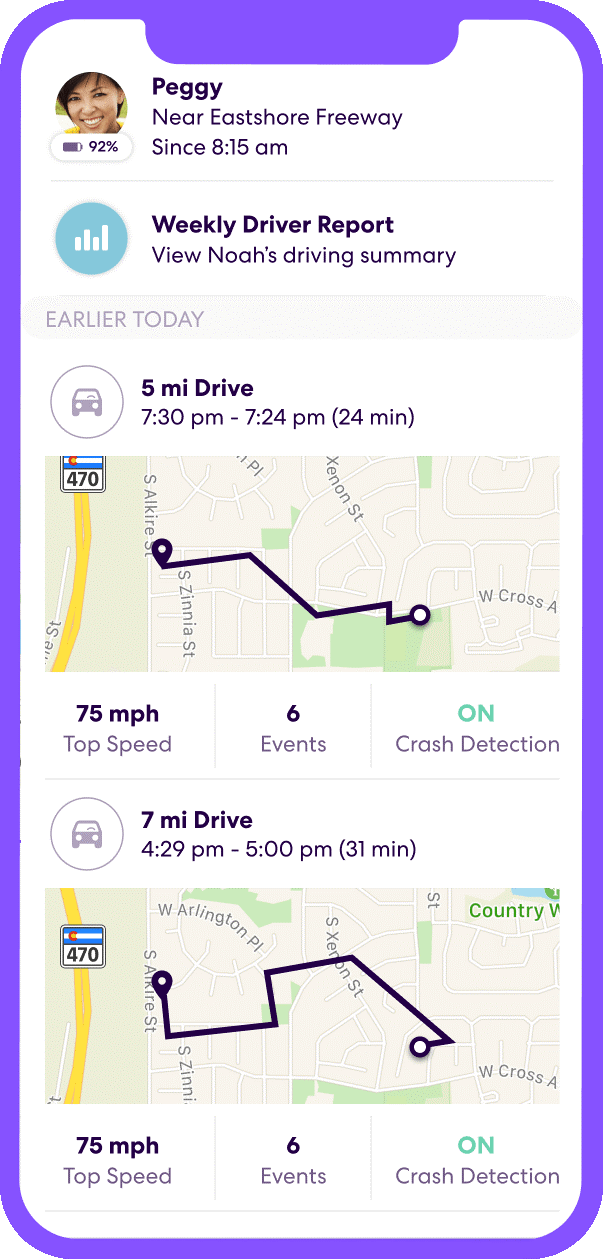
This feature is designed with the safety and security of family members in mind, ensuring that you can keep track of loved ones with their consent and positive intent.
People also read:
Find Previous Locations in Google Maps
To effectively utilize Google Maps for tracking location history, follow these detailed steps. This will allow you to access a comprehensive view of your past locations, providing valuable insights into your travel patterns or the movements of a device you have permission to track.
- Step 1: Launch the Google Maps app on your iPhone. Make sure you're signed in to your Google account. Tap on the menu icon (three horizontal lines) located in the top left corner of the screen. This will open the side menu.
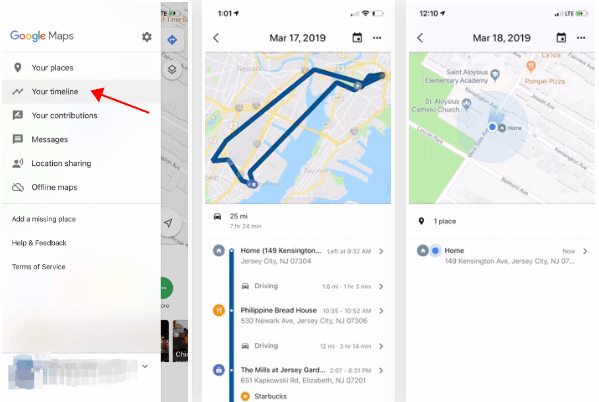
- Step 2: In the side menu, scroll down and select "Your Timeline." This option may be listed under "Your Places" or a similar section.
- Step 3: Once you're in Your Timeline, you can select the date range for which you want to view your location history. You can choose specific dates or use the calendar icon to select a range.
If you need to view the past locations on a desktop, here’s the guide you can follow:
- Step 1: On your computer, go to timeline.google.com.
- Step 2: Use the same Google account linked to your mobile device.
- Step 3: The timeline will show your movements on a map. You can click on specific dates to see detailed routes and stops.
If you cannot locate “Your timeline” on Google Maps, regardless of you’re accessing web version or app, please ensure you have switched on “Location History” to proceed. Otherwise, you are not able to find this feature.
Google Maps will display your location history for the selected date range on the map. You can see the places you visited, routes you took, and the time spent at each location. In addition, you can customize your timeline view, explore specific days or locations, and even edit or delete location entries if needed.
Wrapping Up
In conclusion, accessing your iPhone's location history can provide valuable insights into your past movements and activities. If you are looking for a tracking app for family members, FamiEyes is really worth trying thanks to the the fine balance between the functionality and user-friendliness. Now hit the free demo to give it a try.
FAQs:
Q1: How do you check location history on iCloud?
A: iCloud itself doesn’t offer a direct feature to check location history. However, if you have enabled the “Find My” feature on your Apple devices, you can track the location history of those devices through the Find My app or the iCloud website.
Q2: How can you check activity log on an iPhone?
A: On an iPhone, you can’t directly access an “activity log” in the way you might on a computer or other device. However, with the help of FamiEyes, you can easily access your kids’ iPhone activities, such as text messages, call logs, Safari activities, location history, and gallery.
Q3: Is it possible to check the location history in Find My?
A: It's important to note, however, that the app does not provide a direct feature to view the location history of friends as might be expected. Instead, it focuses on current location details and location-based notifications.
Click a star to vote


